


How to Avoid Distorted Graphic Printing on Trade Show Displays
When designing a display graphic, it is important to make sure the size and resolution of the entire graphic are closely matched with the actual size of the print. When they are not, it often results in pixelated and distorted graphics. While the distortion is not noticeable on a computer screen unless zoomed to the actual print size, it will be noticed once it is printed onto a full sized trade show display.
How to Tell if Your Graphic Printing Will Be Distorted
Here is a 4-step process to tell if your final graphic print will turn out distorted anywhere on your display.
-
Obtain a graphic template for the display product. In most cases, you should already have it at this point in the process, but if not it can often be found as a download on the product page of the website. If it is not located there, one of our friendly Trade Show Joe associates can supply you with the appropriate template.
-
Verify the dimensions of your graphic file are sized according to the specifications of the graphic template. If your graphic dimensions are smaller, it will likely become distorted for this reason when you re-size it. Make sure the dimensions are correct before moving to step 3.
-
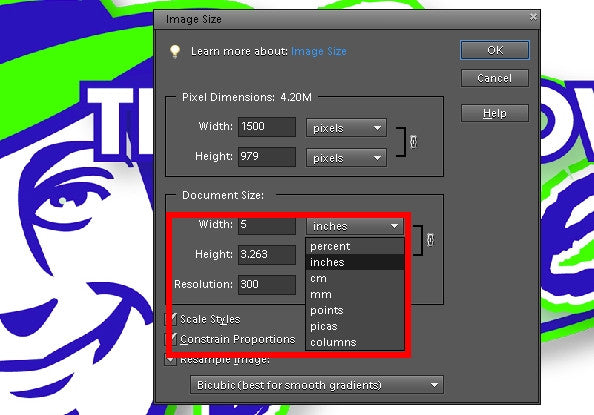
Scale your graphic file size to 100% using the Zoom Tool (magnifying glass). After zooming to 100%, you will only be able to see a small portion of the graphic, and this portion should appear the same size as it will appear on the display after printing.
- Check for distortion/pixelation. Scroll through your graphic file to view various sections of the artwork, paying attention to the edges of lettering and other graphical elements. If they appear blurry, that is how they will look on the final print.
![]()
What Causes Distortion on Trade Show Graphics
Almost every time, one of the two scenarios below is the reason why this problem exists.
The graphic file dimensions are significantly smaller than the display print size.
If the graphic is a rasterized file, such as those with .jpg, .jpeg, or .png at the end of the file name, the dimensions of that file need to be the same or very close to the printing dimensions specified in the graphic template. With most editing software for these types of graphics, you should be able to set the scaling options to inches or cm if you go to re-size the graphic. (Keep in mind this is just a way to tell if this is the problem and not necessarily how to fix it. If it is too small and you re-size it this way it will still stretch everything out and appear distorted.)
The graphic file dimensions are correct, but some elements within the graphic were enlarged during editing, causing distortion/pixelation.
Even if you started out with the template and the correct size graphic file when you began editing, it is still important to make sure any element you add to the graphic is either vectorized or an appropriate size for the template. If not vectorized, the image, logo, or text you are embedding should already be the same size or larger than it will appear on the final graphic. If you start with something small and scale it to be substantially larger, this will usually result in distortion.
More Graphic Editing Details and Guidance
Vector graphic software, such as Adobe Illustrator, is best for creating large-print graphics. This is because vector graphics are not made up of pixels that simply enlarge across the entire graphic when scaled to be larger for printing. Vector graphics are made with a more dynamic image mapping process that includes details on specific colors, angles, and other elements. When enlarged, the graphic is remapped into a larger format, maintaining the same image quality. However, rasterized images and logos can still be embedded into a vector graphic project if necessary. In this case, they need to be the correct size, or larger and scaled down. If they are too small and scaled to be larger within the graphic project, they will become more distorted the larger they get.
Common Vectorized Graphic File Formats: .eps, .ai, .pdf
If using raster graphic software, such as Adobe Photoshop, your project canvas needs to be the correct size from the very beginning. The same as above applies when embedding images and logos into this type of graphic editor. Make sure they are big enough!
Common Rasterized Graphic File Formats: .jpg, .jpeg, .png, .gif, .tif, .tiff, .bmp


Comments